DIY Drip Irrigation Systems
Plantforum • December 9, 2019
How to Install Drip Lines in Your Garden
Installing a DIY drip irrigation system into your garden is a great way to reduce your garden chores while also reducing the amount of water you use in your garden. Drip irrigation is easy to install and even easier to use. Once you’ve got your DIY irrigation system in, you’ll have more time to enjoy your garden!
DIY Irrigation Systems: Why Drip Line
We chose drip line over other types of irrigation (such as in-ground sprinklers) for a few reasons:
- Drip irrigation systems are very water efficient. Very little water is lost to evaporation, unlike overhead sprinkler systems.
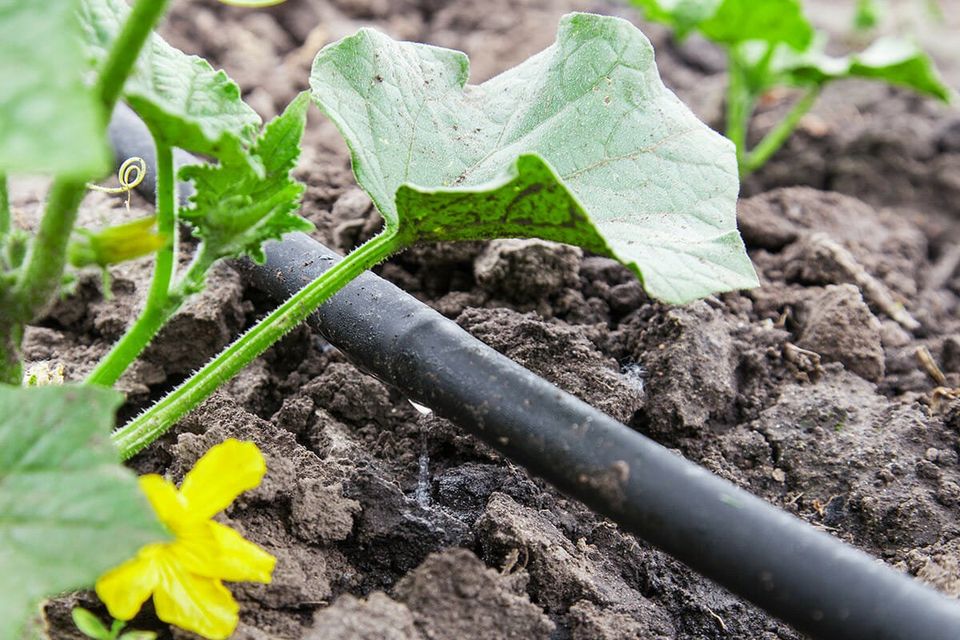
- Drip irrigation puts the water right at the base of the plant rather than watering the leaves. This minimizes moisture-related problems on plant leaves.
- The materials are easy to find locally.
- The materials were cost effective.
- The line is heavy duty and will last a long time, and is relatively easy to work.
- The components for installing DIY drip installation are interchangeable, making a custom line arrangement simple.
- The hoses are brown or black, meaning that the hose will blend in with the topsoil. Having everything blend during this transition period is a nice touch.
Steps: Planning DIY Drip Irrigation
- Sketch out the area using the paper and pencil. Draw a rough perimeter of the garden, the water spigot, and any other important features (fences, walkways).
- Sketch in imaginary drip lines where you envision your lines going. Make sure to pass the line close by existing plants or areas in which you plan to install new plants. Draw drip emitter line (line with holes in it) wherever you have plants that require water. Draw solid/blank hose line to connect the drip emitter line from the garden to the water tap. You don’t want drip line with holes in it coming immediately out of the water spigot as it will create a muddy mess by your water outlet.
- Measure the garden area. Add the measurements to your drawing. Also measure the desired drip line lengths as best as you can. Wrap the tape around the garden as if it were the line. If this is too fussy, just loop the tape around the garden leaving lots of space, and take that measurement. When you have the actual emitter line, winding the hose through the plants will take up the extra line. Update your sketch to include any changes.
- Calculate the total length of required emitter line and solid line that you’ll need for your irrigation system design. Plan to buy 5-10% more line than you’ll need (of each type).
- Calculate the type and number of connectors and collars required for your desired configuration. If it isn’t obvious what you’ll need, go back to your drawing. Make sure you’ve sketched out exactly where the emitter line will go, and then where the solid line will go. How many emitter lines come out of the solid line? Ask yourself what each connection will have to look like. Each time you connect a line to a connector, you’ll need a collar to hold the line onto the connection. For instance, a T-shaped connector has 3 lines going into it and would therefore require 3 metal collars (see photo above). It can be a bit tricky to imagine. If you can’t picture it, just buy a few of each type (T, Elbow, Straight), and then return what you don’t use.
- If you’ve ever wanted to lay landscaping fabric or add more topsoil to the garden, now is the time. Trying to add fabric or soil under the lines is a challenge If this is on your mind, do it now (before you install your DIY drip irrigation lines on top of your garden bed).
Steps: Installing DIY Drip Irrigation
- Purchase your supplies. Keep the receipt in case there is an extra T-connector or two hanging around when you’re done.
- Uncoil the tubing lines along a smooth, dry surface such as your lawn to allow the coiled line to settle and relax into straighter line
- Set up the watering timers for your desired time. Check your bylaws for the hours in which watering is allowed. Early morning, such as 3-5 AM, is generally a good pick.
- Attach the watering timer(s) to the water outlet(s). Make sure the tap is set to off before/during/after attaching it.
- Lay out the solid/blank line from the water outlet to the garden.
- Lay out the emitter line around or beside the garden. Envision how the line will weave through the garden, but keep line in large loop around/beside the garden for now. You’ll put it in it’s permanent place after the connections are done.
- Once you’re sure you have enough line, use the garden shears or a tubing cutter to cut the solid and emitter tubing to the desired lengths. Leave a little extra on each unless you are 100% confident in your measurements and ability to install connections.
- Place metal connector collars around all the tubing ends.
- Push the tubing connector into the cut ends of the hoses.
- Slide the metal collars up onto the portion of the tubing which is on the connector. Use the drill to tighten the collars onto the tubing.
- Install any remaining connectors.
- Install the hose connector on the end of the solid line that will go into the water outlet.
- Connect the hose connector to the watering timer.
- Use the timer’s manual setting to “pressure test” the system. Turn on the irrigation system and walk the length of the line. Pay special attention to connections. If you notice a connection that is leaking, tighten the collar. If that doesn’t fix the connection, turn off the water and replace the connection.
- Once you’re sure the system is working as intended, place the line up into the garden in the permanent location. Use the landscape staples to hold the line in place.
The 2019 SGASA Symposium was held in a lush and very green KwaZulu-Natal, a stark contrast to the dry conditions of the previous symposium held in the Cape